CANVAS ACCESSIBILITY
This is an overview of creating accessible content in Canvas. Accessible content in Canvas will allow information to be readily available for assistive technology. Screen readers can easily navigate the content when accessibility is considered during the design process. This will not only benefit people with disabilities, it will improve overall usability for all users. This information will cover creating accessible content using the rich content editor, uploading documents and multimedia, and scanning a course for accessibility.
In this Tutorial
Layout and Design
The Rich Content Editor is used to add or edit content in Canvas. The styling option icons are similar in appearance and functionality to other editing programs. This tutorial will highlight various styling options to increase accessibility.

Headings are styles to give a page structure by category or topic. Headings are used to build sections within a page to create a visual hierarchy structure to show topics and sub-topics. A screen reader or viewer can easily find information based on headings. For example, if you were only looking for creating accessible tables on this page, you can skim (visually and technically) this page to find the sub-topic quickly. This improves usability, efficiency, and accessibility.
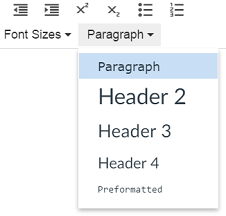
Heading styles options are located under the Paragraph drop-down. Click Paragraphs, select the desired heading and begin typing. Highlighting a word and selecting the heading styling will change the heading. Please note the title of the page is classified as Header 1. Selecting heading styling should replace manually selecting fonts and sizing.

Below is a sample of the hierarchy structure. Use Header 2 for the page title and Headers 3 and 4 for sub titles/topics and categories. Paragraph is used for the body of the content:

Organizing information on a page using bullets or numbered lists presents content in an organized manner and is recognizable to assistive technology. For example, when numbered lists are used screen readers will automatically detect the sequence and announce, “Number 1…” Be sure to use numbered lists for sequential ordered content and bullets to present summarized/brief content.

Images can be inaccessible for people with low vision, color blindness, or who are Blind. To provide equal access to information presented in visual formats, a detailed written description of the image is required. Completed one of the following to provide descriptions for images:
- Providing a written description below the image (on the page)
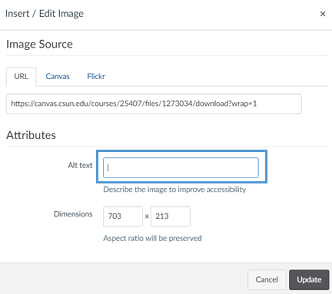
- Inserting an alternative text clicking Embed Image. Write the alternative text in the Alt Text field.


A written description or alternative (alt) text provides a written description of the image to screen readers. Consider the best description option for the image and page.
Additional Considerations
- When inserting the image, be sure to use the picture inline option to optimize reading order for screen readers
- Alternative text is extremely critical for images used for instructional purposes. For assessment statements such as, “Use the graph to answer questions 1-3” an alternative text is required for the graph.
- Complex (Math and Scientific) graphs and charts may require a caption (for larger amounts of information) to write a detailed descriptions
- Decorative images, such as line dividers, do not require a written description or alt text
Best Practices
- Be clear and specific
- Use phrasing to include inferred information
- If the image is for instructional purposes, be sure to include necessary information to answer questions
Canvas provides a wide range of color options. However, the majority of the colors fail to meet the WCAG 2.0 AAA standards for color contrast. Color contrast plays an important role when viewing content for people with low-vision or color blindness. Images that convey meaning or create emphasis, using color, creates a barrier because it is not perceivable by all users. Additionally, typed text in neon and pastel colors can increases eyestrain over time, which can be taxing for any reader. Note: The color white passes when the background is set to black (or equally dark color).
Best Practices
- Images using color to convey meaning: write an alternative text to provide a color key description for all viewers to access
- Use a browser extension i.e. WAVE to test a page for any color contrast issue
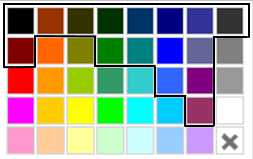
- Consider using one of these higher contrast colors while developing content in Canvas:
- Color options: highlighting top row and sections of lowers rows

Tables are used to visually organize cross-referencing information. However, sometimes tables are used to organize the layout of the page or as a text box. Screen readers cannot decipher this type of content within tables and should be avoided. Use tables to organize structured information:

Links can help redirect a viewer to related content. Links should be clear and directly relate to the title or heading of the linked page. Links with vague wording such as, “Click here for more details” or “Go here for more information” can be misleading for screen readers and keyboard users. Instead, use direct wording such as, “Visit the Design Center for more information about accessibility.”
Adding Content
Canvas provides simple ways to add content. However, it is important to provide an inclusive setting to ensure all students have access to instructional materials. When selecting and developing content to add into Canvas, be sure:
- Documents are accessible i.e. Syllabus, OER content, etc.
- Videos recorded in Canvas or external video have captions and transcripts
- Images have alternative text
- Podcasts or audio files have transcript
Testing for Accessibility
WAVE is a free browser extension that will scan any web page for any potential errors or warnings. Scanning a Canvas page for accessibility takes a little time and can alleviate inaccessibility issues in the future. When all editing is complete, scan the page. Download the WAVE browser extension and scan the Canvas page for accessibility.
Best Practices
- Create accessible Canvas pages during the design/creation process
- Use a browser extension, such as WAVE, to scan for accessibility
- Foster an inclusive setting by adding content with accessibility in mind
Resources
Related Topics